

9 Part Series.
Australian Vintage Radio
Radio Servicing Information
For use by legally qualified and licensed repairers only
Countries have laws regulating who is legally allowed to repair or work on electrical equipment that will be plugged into the mains electricity supply. This is to protect the public from the risk of electric shock. If you are not lawfully allowed to repair electrical equipment yourself, you must find an electrician, a licensed electrical mechanic or electrical contractor or electronic technician to do any work on the equipment.
Different countries use electricity supply at different voltages. The United States uses 110-120 volts AC. The United Kingdom and Australia (amongst many other countries) uses 240 volts AC. Any electric shock at Voltage 110v or above is likely to be lethal.
Many types of early consumer electronic equipment was constructed at a time when electrical safety was not as carefully considered as is required under manufacturing laws today, and many early radio sets etc have mains electricity wiring and metal mains voltage terminals fully exposed to be touched once the metal chassis is removed from the wooden case or bakelite housing.
This is why any electrical work to restore or repair an old radio must be done by a licensed qualified technician.
YOU MUST NOT ATTEMPT TO REPAIR THE RADIO YOURSELF UNLESS YOU ARE LEGALLY ALLOWED TO DO SO.
INTRODUCTION
The practice of repairing valve technology is disappearing. However, it is not difficult, and can be easily understood. With a little care and thought, most faults can be readily put right. This is because the components used in valve technology are large, simple, still available, and usually connected using "point-to-point" wiring methods.
BEWARE
Before applying the mains voltage to the rado, it is also vital to check that there are no components that due to ageing or oveload have deteriorated and become internally short circuited.Such short-circuited components could possibly connect the active mains voltage to the metal chassis of the equipment. The metal chassis could then deliver a lethal electric shock when touched. Also, some electronic equipment (eg Televisions) were manufactured in the past with a "Live Chassis" The chassis istelf was connected to the live mains voltage!
See our SAFETY section before working on equipment. Keep safety in mind at all times, as valve technology uses high voltages.
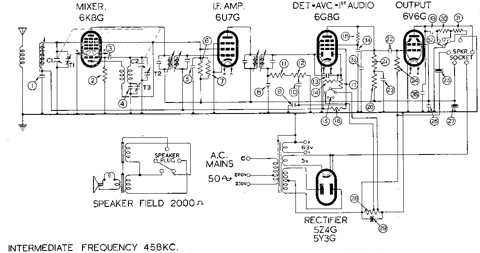
I will refer to a common valve domestic broadcast receiver, as an example, to describe common faults, and how to fix them. I will introduce a little theory and safe operating procedures, to protect you, and the radio. The common superheterodyne from 1940 has 4 valves plus one extra for the power supply, so an easy way to describe it, is to call it a 4/5 valve radio. This typical radio has a 240 volt AC mains power supply, using a transformer and a valve rectifier. There are many variations. Please refer to the circuits that show typical radios and with different valve types depending on the time it was built.
SAFETY
A radio is no good if you reduce it to a smoking ruin.
The idea behind fixing the radio, is to improve the performance.
Therefore, check the radio carefully for dangerous parts or damage, and fix them BEFORE powering it up.
Make sure it cannot fall over and break the glass valves, or something fall into it and damage a component, or that balancing it upside down doesn't break the dial glass.
Check filter capacitors so they don't get hot and explode.
Check mains transformers so that they don't overheat or burn out and can't be replaced.
Keep the bench clear of rubbish, swarf, solder blobs, food, drinks and any junk.
Only work on one radio at a time.
If you can't fix it, or get frustrated, draw a diagram or sketch, label the parts, put them all in a box, and put it aside for a time.
Go on with something else.
A person is no good if they are lying dead on the floor.
If you can't fix a radio without killing yourself, getting a shock, or getting a burn, or using a laywer, then don't touch it.
Get someone else to fix it for you. It will be cheaper.
Turn the radio OFF and unplug it, when replacing components, turning it over, or adjusting things.
Use insulated screwdrivers, cutters, soldering iron, and alignment tools.
Don't eat or drink while working, as spilled fluids can ruin a radio and conduct voltage to you.
When finished working on a radio, wash you hands before eating and drinking, as the chemicals, toxins, animal residue, or manufacturing byproducts can affect you.
Some older radios used radium on their dials, some military radios used radium in their meters and in the fluorescent paint.
Some radios used aspestos.
If in doubt wear gloves and a mask.
There are many different designs in radios, some are better than others, and some are easier to fix than others. Take it carefully and slowly and try to understand what you are doing and why you are suspecting a component. Logically determining a fault, is the best way to achieve success. If things don't make sense, give up, go away, come back after a sleep or a rest, and things suddenly may be clear.
Your repairs should be generally neat, and soldering tidy. Avoid burnt wires, solder splats, and modifying the radio in any way. Try and use period components and wire. Don't burr screws and scratch any surfaces. Lace up cables and looms. Don't use modern screws, old imperial screws can still be purchased. Don't clean the numbers off valves or components. If in doubt, stop and think about it. Ask someone. There is a lot of people in the H.R.S.A. (Historical Radio Society of Australia) and on the internet who have knowledge and are willing to help.
CLEANING
Clean the underneath and inside of the radio, removing loose rust and dirt.
Start with an air source and blow out the dust, prefrebly outside. Otherwise, use a soft paintbrush, and assist with blowing. Don't inhale. Clean out all spiders, wasps, cockroaches, mice, grass, newspaper and droppings. Don't cut yourself as you can get an infection. I heard of someone who got hepatitis from a cut from a chassis infected with rat urine.
Replace any damaged components, including those wires or capacitors that may have been eaten by mice.
Use a damp rag, and wipe away any stuck dirt. Dry in the sun, but not direct sunlight as you might melt the dial or case.
So far we have avoided solvents.
If a radio has been in a kitchen or near someone who was a smoker, then it may contain oil or grease. Use "Nifty" to dissolve the grease and wipe away. This is a spray cleaner in a squirt bottle, that melts grease. Good for hand marks around knobs too.
Never use metholated spirits (alcohol) ot turpentine, as these will remove labels, stencils, transfers, and can attack the plastics, rubber, and destroy a dial scale.
Test all cleaning agents FIRST, on a small area of the chassis or case, that is not visible, like an area underneath.
Rust can be removed by scraping, and then sealed with a lacquer. Rust converters or replating the chassis are not usually necessary, unless you want to strip the chassis completely.
DIAL SCALES.
These are extremely important and can be easily damaged. A radio without a dial scale is not worth a great deal.
The scales are usually glass or plastic, and old and brittle. The plastic is not flexible anymore, and the rubber covered clamps that hold the glass may have hardened. The scales can be ruined, and easily made opaque with alcohol or turps, or have their station legend removed with water. Clean the front ONLY with a damp cloth. No "Windex" (alcohol based). If you really have to, and I mean REALLY have to, clean the back carefully with a soft brush, that is all. Even this may remove the lettering! Be gentle.
In the situation where the station legend has started to fall off, you have nothing to lose, so get a spray can of clear lacquer, like clear "Estapol". Put the dial scale flat, with the legend side up. Spray a 1 second duration VERY, VERY light mist from a LONG distance. Just a slight mist, nothing more. Wait for it to dry. Spray another mist. Wait for it to dry. Do this a few more times. If your mist coat is too close or too heavy or the wind from the can too strong, the letters of the station legend will move. If the spray coat is too heavy, the spray solvent will buckle the lettering. The theory behind this method, is that a few tiny spots of lacquer, will act like tiny spots of glue, and hold the letters on to the glass. A solid total covering is not required. Good luck, as this method does not always work.
If the glass is broken, you can make a colour scan of the dial scale, using a computer, and then print the scan with a colour printer on a transparency. This can be placed behind the glass or sometimes glued on.
HISTORY
Find out the history of the radio. Ask the seller, where it came from and who owned it. Sometimes just knowing it had been bought new by someone's grandfather is very interesting. Get a circuit diagram so that fixing it will be a lot easier. Circuits are sometimes in the back of the cabinet, or available from the web, or from the HRSA. The manufacture's name, chassis number, and valve types help identification. There was a series of books, one released every year, which contained manufacturers circuits for that year. It was called the AORSM (Australian Official Radio Service Manual), and they are available on CD now. Also, the coloured ARTS&P sticker will help place the year of manufacture. The history behind this label is interesting. There were patents on things like valve sockets and other parts, so Australian law required that royalties were paid when using these items. The stickers were sold to the radio manufacturer upon a royalty payment and each legal radio had one affixed to the chassis. The colour changed each year so it is easy to determine the year of manufacture.
Draw diagrams as you dissassemble things, especially dial cords, component positions, and mechanical mechanisms. Perform a visual inspection for exposed wires, sharp edges, insects, animals. Remove anything that should not be there. Fix any mechanical faults. Lightly oil the moving parts. Quite often, someone has installed "improvements" and in some cases, I have fixed a radio by removing these improvements.
Section 1
Section 2
Section 3
Section 4
Section 5
Section 6
Section 7
Section 8
Section 9